


This week’s One Room Challenge update is a blog version of an out-of-office. Currently I am somewhere in the air en route to Florence, Italy. If you’ve been following my renovation you might have caught this last minute ticket purchase somewhere around week 3. Please feel free to follow along on my journey there on Insta. To summarize the last few weeks. I started this process 6 weeks ago living in my parent’s basement with my little family of 4 all sleeping in one window-less room. Two weeks ago we moved into our newly renovated historic home. This weekend I am turning 40 on another continent, and hopefully next week I am back stateside ready to REVEAL the sparkling room my entire family lovingly helped me create.
Two humans in particular were integral to this process. Mom and Pops selflessly offered to install the wallpaper. Now, this might frighten some hearing my parents handled this important task. However, my dad happens to be the person who handed me down the lovely gift of OCD. I know no more meticulous man living in this world and he’s awesome.
Many many houses with my interior designer momma has brought him to near expert status. So I, defer this week’s tutorial to my dad as the guest blogger. Who did an AMAZING job creating my feature wall. We might have heard some F-bombs from afar, but whenever I popped my head in the room he had a smile for me.
Warning, this gets long, but if you are inspired reading all these amazing One Room Challenge makeovers and feel like taking on your own wallpaper install, these are some juicy pointers.
WALLPAPER TIPS FROM DAD
Q: How much to buy? You know, so half way through a make-over competition I don’t have to order more?
A: My wallpaper ordering philosophy is similar to my ordering philosophy when we are having guests over to the house….always order extra! I would rather have too much than too little. You want to make sure all your wallpaper rolls are from the same dye lot so the colors match from roll to roll. Measure the length of the wall times the height of the wall to get the total square footage. I typically don’t deduct for the windows and doors to make sure I have enough extra. Also, consider the paper repeat when calculating how much to order. Once I have the square footage I consult a wallpaper ordering guide for the corresponding number of rolls.
Q: What utensils do I need to apply it?
A: Patience – the most important tool!
Utility knife with plenty of extra blades. Change frequently for a sharp edge
Seam roller
Wall paper brush for smoothing the paper and eliminating bubbles
Wide putty knife to use as a guide for cutting
Water bucket
Sponge – clean frequently
Drop cloth to protect the floor
Nice long table
Carpenter’s level
Pencil
Tape Measure
Nice long table
Wallpaper tray – if using a pre-pasted wallpaper
Wallpaper paste – if using unpasted wallpaper
Q: Where do you normally begin installing on the wall?? I noticed from my not-helping-at-all distance that you began applying strips in the middle.
A: Before beginning I develop my “plan of attack”. This is to determine if I am going to start in a corner (normally a left hand corner and then working to the right), or starting in the middle of the room. I usually make that decision depending on if there is a window near the left hand corner. If there is, I start in the middle of the wall so that I can draw a long plumb line using the carpenter’s level to make sure that the wallpaper is straight. You use the line to install your first piece. Then use the level to check after every few pieces to make sure the wallpaper is still going on straight. No matter where I start I always move to the right. The “plan of attack” also includes determining where you want elements of your pattern to be on the wall (at what height).
Q: Do you cut a sharp edge before or after placing on wall?
A: When cutting the wallpaper I usually add two to three inches at the top and the bottom to allow for trimming once the paper is in place.
Q: How did you meticulously <ahem> magically cover that electrical outlet?
A: I usually try to find a scrap piece that matches the area around the cover. I temporarily put the cover on the outlet or switch and then line up the scrap piece of wallpaper to match the pattern on the wall. Cut the scrap piece of wallpaper about a 1 inch longer than the plate cover, Double check that the wallpaper on the cover plate matches the wall, then cut to the four corners of the plate and fold over onto the back side of the plate. The folded over pieces then can be glued to the back side of the plate (I usually use Elmer’s Glue). Then cut an “X” with the knife for the holes in the outlet or switch cover, fold and glue those sections on the back on the plate.
Q: Tips for a novice?
A: Same rule as in carpentry…measure twice and cut once! (Double check your measurements prior to cutting the paper).
Inspect the paper after hanging to make sure all there are no air bubbles.
Clean the wallpaper as you go (with a clean wet sponge) to make sure you clean up the excess paste.
I said this above, but it is worth repeating….change the blades in the utility knife frequently. (Wallpaper tears easily with a dull blade).
When you finish, have a glass or two of wine – you deserve it!
If all else fails, hire a professional.
I mean how lucky am I? Sheesh I heart my dad. And wouldn’t be fair not to mention mom, who assisted him along the way with moral support, a second set of hands, and who took the brunt of the frustration storms like a champ.
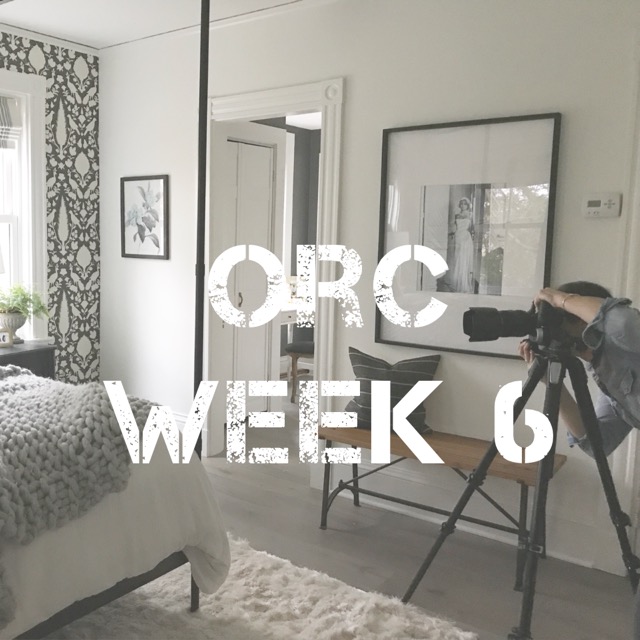
Look forward to seeing you next week for Reveal week! Happy to share true professional pics finally. My room just got captured in action prior to my departure. Check ya on the flip side of this reno!

The wallpaper I chose for our bedroom is Chenonceau from Schumacher.
My ORC Week 5
My ORC Week 4
My ORC Week 3
My ORC Week 2
My ORC Week 1


its looking so fab in here!
Thank-you so much! 🙂
Looking sooooo good!! what a sophisticated and restful retreat! can’t wait to see it all next week!
How to wonderful to have your dad and mom as a big help – makes your new retreat all that more special as well as the new house! The paper is my favorite – and I’m giddy to see the final pictures b/c it’s already looking smashing!
Thank-you! Yes, the paper is almost a cheat its so good, how can one look like a bad designer? 😉 I am about to go stalk you for your final reveal. Cant wait to see it!